 A roofing company can help you repair a leaky roof
Charlotte’s top roofing company can help you identify roof leaks and fix them. A leaky roof can spell disaster for any homeowner. Not only can it cause damage to your property and belongings, but it can also lead to costly repairs if left unaddressed. Regularly testing for leaks on your roof is crucial for maintaining the integrity of your home and ensuring its longevity.
Repairing Roof Leaks and Knowing When to Seek Professional Help Once you've identified a leak on your roof through testing, it's crucial to address the issue promptly to prevent further damage to your home. While some minor repairs can be tackled by homeowners with basic DIY skills, more complex issues may require the expertise of a professional roofing contractor. Here's how to approach repairing roof leaks and when to seek professional help:
By understanding how to approach repairing roof leaks and when to seek professional assistance, homeowners can effectively maintain the integrity of their roofs and protect their homes from water damage. Regular testing, timely repairs, and preventative maintenance are key to ensuring the longevity and performance of your roofing system. Hire Charlotte’s top roofing company Advanced Roofing and Exteriors offers commercial roofing and residential roofing services to Charlotte, NC, Indian Land SC, and surrounding areas.
0 Comments
 Roofers can help maintain a functional roof
Roofers in Charlotte NC can help you maintain a functional roof. When faced with damage to your home's roof, whether from severe weather, falling debris, or wear and tear over time, it can be tempting to immediately contact your insurance company to file a claim. After all, insurance is there to help cover such unexpected expenses, right? While this may seem like the logical first step, there's a crucial intermediary step that homeowners often overlook: calling a roofer. In this article, we'll delve into why it's essential to reach out to a roofing professional before contacting your insurance company. 1. Assessing the Damage One of the primary reasons to call a roofer before your insurance company is to accurately assess the extent of the damage. Roofers are trained and experienced in identifying various types of roof damage, from missing shingles to structural issues caused by storms or other external factors. By having a professional inspect your roof first, you'll get a comprehensive understanding of the damage and what repairs are needed. 2. Preventing Further Damage Damage to your roof can worsen over time, especially if left untreated. Calling a roofer promptly allows you to address any immediate concerns and prevent further deterioration. Whether it's patching up leaks or securing loose shingles, a roofer can take immediate action to mitigate the damage and protect your home from additional harm. 3. Expert Advice Roofers possess valuable expertise when it comes to roofing materials, repair techniques, and building codes. By consulting with a roofer before contacting your insurance company, you'll gain access to expert advice on the best course of action for repairing or replacing your roof. This insight can be invaluable in making informed decisions about how to proceed with your insurance claim. 4. Documentation and Evidence When filing an insurance claim for roof damage, documentation is key. Roofers can provide detailed reports and photographs documenting the extent of the damage, which can strengthen your case when dealing with your insurance company. Having thorough documentation from a trusted professional can expedite the claims process and increase the likelihood of a successful outcome. 5. Avoiding Claim Denials Insurance companies often scrutinize claims for roof damage, looking for reasons to deny coverage or minimize payouts. By involving a roofer from the outset, you can ensure that your claim is thorough and accurate, reducing the risk of denial due to insufficient evidence or overlooked details. A roofer can help you navigate the complexities of the claims process and advocate on your behalf to ensure fair treatment from your insurance provider. Common Mistakes to Avoid When Dealing with Roof Damage Dealing with roof damage can be a stressful and overwhelming experience for homeowners. From assessing the extent of the damage to navigating the insurance claims process, there are numerous challenges to overcome. To ensure a smooth and successful resolution, it's essential to avoid common mistakes that can hinder your efforts to repair your roof and secure adequate insurance coverage. In this section, we'll highlight some of the most common pitfalls to avoid when dealing with roof damage. 1. Waiting Too Long to Act One of the biggest mistakes homeowners make when faced with roof damage is waiting too long to take action. Whether out of fear of the cost or a belief that the damage isn't severe enough to warrant immediate attention, delaying repairs can lead to further damage and costly consequences down the line. It's crucial to address roof damage promptly by calling a roofer and initiating the necessary repairs as soon as possible. 2. Attempting DIY Repairs While it may be tempting to tackle roof repairs on your own to save money, DIY repairs can often do more harm than good. Roofing is a specialized skill that requires knowledge, experience, and the right tools and materials. Attempting DIY repairs without the proper expertise can result in subpar workmanship, further damage to your roof, and even safety hazards. It's best to leave roof repairs to the professionals to ensure quality work and long-term durability. 3. Neglecting Regular Maintenance Proper maintenance is key to preserving the integrity of your roof and prolonging its lifespan. Neglecting routine maintenance tasks, such as cleaning gutters, inspecting for signs of damage, and addressing minor issues promptly, can leave your roof vulnerable to damage and deterioration. By staying proactive about roof maintenance and addressing potential problems early on, you can prevent costly repairs and extend the life of your roof. 4. Filing an Incomplete or Inaccurate Insurance Claim When filing an insurance claim for roof damage, accuracy and thoroughness are essential. Providing incomplete or inaccurate information to your insurance company can result in claim denials or reduced payouts. It's crucial to document the damage thoroughly, obtain estimates from reputable roofers, and communicate openly and honestly with your insurance provider throughout the claims process. By being diligent and transparent, you can increase the likelihood of a successful insurance claim and expedite the repair process. 5. Ignoring Red Flags Finally, it's essential not to ignore red flags when it comes to roof damage. Whether it's visible signs of water damage inside your home, sagging or buckling roof surfaces, or persistent leaks, these are indicators of underlying issues that require immediate attention. Ignoring red flags or dismissing them as minor issues can lead to more extensive damage and costly repairs down the line. It's crucial to address any warning signs promptly and enlist the help of a qualified roofer to assess and repair the damage before it escalates. In conclusion, avoiding common mistakes such as waiting too long to act, attempting DIY repairs, neglecting regular maintenance, filing incomplete insurance claims, and ignoring red flags is essential when dealing with roof damage. By being proactive, diligent, and informed, homeowners can navigate the challenges of roof repair and insurance claims with confidence and ensure a successful outcome. Remember, when it comes to your roof, taking prompt and decisive action is key to protecting your home and preserving its value for years to come. Hire the best roofers in Charlotte NC Advanced Roofing and Exteriors offers commercial roofing and residential roofing services to Charlotte, NC, Indian Land SC, and surrounding areas. 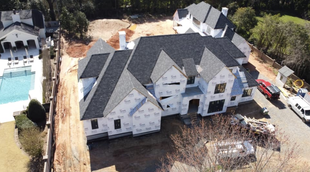 A roof installer can help you install a proper roof A roof installer in Charlotte and Indian Land SC can help you maintain a functional roof. Roofing a house is a significant undertaking, whether you're a seasoned professional or a DIY enthusiast. A well-installed roof not only protects your home from the elements but also adds to its aesthetic appeal and value. However, to achieve a successful roofing project, careful planning and precise execution are essential. In this guide, we'll walk you through the step-by-step process of roofing a house. Step 1: Assess the Current Roof Before you start, evaluate the condition of your current roof. Look for signs of damage such as missing shingles, leaks, or sagging areas. Assessing the existing roof will help you determine if any repairs are needed before installing a new roof. Additionally, take measurements of the roof's dimensions to calculate the amount of materials required for the project. Step 2: Choose the Right Materials Selecting the appropriate roofing materials is crucial for the longevity and durability of your roof. There are various options available, including asphalt shingles, metal roofing, wood shakes, and clay tiles, each with its unique benefits and aesthetic appeal. Consider factors such as your budget, climate, and architectural style of your home when choosing the roofing material. Step 3: Obtain Necessary Permits Depending on your location, you may need to obtain permits before starting the roofing project. Check with your local building authority to determine the requirements and ensure compliance with building codes and regulations. Failing to obtain the necessary permits could result in fines or delays in the project. Step 4: Gather Tools and Equipment Make sure you have all the tools and equipment required for the roofing project. Typical tools include a hammer, nails, roofing nails, a utility knife, a chalk line, a ladder, safety harnesses, and a roofing nail gun for efficiency. Having the right tools on hand will streamline the installation process and ensure safety throughout the project. Step 5: Prepare the Roof Surface Before installing the new roofing material, it's essential to prepare the roof surface properly. Remove any debris, old shingles, or roofing materials from the existing roof. Inspect the roof deck for signs of damage and make any necessary repairs or replacements. Ensure that the roof surface is clean, smooth, and free of any obstacles that could hinder the installation process. Step 6: Install Underlayment and Flashing Once the roof surface is prepared, begin by installing a layer of roofing underlayment. The underlayment acts as a waterproof barrier and provides additional protection against leaks. Next, install flashing around roof penetrations such as chimneys, vents, and skylights to prevent water infiltration in vulnerable areas. Proper installation of underlayment and flashing is critical for the long-term performance of the roof. Step 7: Plan the Layout Before installing the roofing material, plan the layout to ensure a uniform and visually appealing finish. Start from the bottom of the roof and work your way up, overlapping each row of shingles or roofing material to prevent water penetration. Use chalk lines or other marking tools to guide the placement of the roofing material and maintain straight lines across the roof surface. Step 8: Safety First Throughout the roofing process, prioritize safety above all else. Wear appropriate safety gear, including gloves, goggles, and non-slip footwear, to protect yourself from injury. Use caution when working on ladders or elevated surfaces and consider enlisting the help of a professional roofing contractor if you're not comfortable with heights or unfamiliar with roofing techniques. Step 9: Install Roofing Material Begin by laying the first row of roofing material along the bottom edge of the roof, starting from one corner and working your way across. Whether you're using asphalt shingles, metal panels, or another type of roofing material, follow the manufacturer's instructions for installation. Secure the roofing material in place using nails or roofing nail guns, making sure to drive the fasteners into the designated areas to prevent damage to the material. Step 10: Apply Ridge Ventilation Proper attic ventilation is essential for maintaining the longevity of your roof and preventing moisture buildup in the attic space. Install ridge vents along the peak of the roof to allow hot air to escape and create a balanced airflow system. Ridge vents should be installed beneath the roofing material and covered with ridge caps for a seamless finish. Step 11: Cut and Fit Shingles As you work your way up the roof, you may need to cut and fit shingles or roofing material to accommodate corners, angles, and roof penetrations. Use a utility knife or roofing shears to trim the material to size, ensuring a snug fit and proper alignment with adjacent rows. Take care to stagger the seams between shingles to enhance the roof's structural integrity and aesthetic appeal. Step 12: Install Roof Edge Once the main portion of the roof is covered with roofing material, install roof edge flashing along the eaves and gables to provide a finished appearance and protect against water infiltration. Secure the roof edge flashing using nails or roofing adhesive, ensuring a tight seal along the roof's perimeter. By following these step-by-step guidelines and paying attention to detail throughout the process, you can successfully roam your house and enjoy the benefits of a durable, weather-resistant, and visually appealing roof for years to come. Whether you're tackling the project yourself or hiring a professional contractor, proper planning, execution, and attention to detail are key to a successful roofing project. Hire the best roof installer in Charlotte and Indian Land SC Advanced Roofing and Exteriors offers commercial roofing and residential roofing services to Charlotte, NC, Indian Land SC, and surrounding areas. 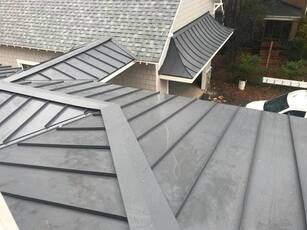 Metal roofing experts can help you have adequate information on roofing systems
Metal roofing experts in Charlotte and Indian Land SC can help you maintain a functional roof. Metal roofing has gained significant popularity in recent years as a durable and stylish option for homes and commercial buildings. However, despite its numerous benefits, there are still several myths and misconceptions surrounding this roofing material. In this article, we'll delve into some of the most common myths about metal roofing and debunk them with facts and evidence. Myth #1: Metal roofs attract lightning One of the most prevalent myths about metal roofing is that it attracts lightning strikes. While it's true that metal is a conductor of electricity, the notion that metal roofs attract lightning is largely unfounded. In reality, lightning is attracted to the highest point in the vicinity, regardless of the material. Tall trees, structures, and even people can be more attractive targets for lightning strikes than metal roofs. Moreover, metal roofs are not combustible, so they are actually safer in the event of a lightning strike compared to flammable roofing materials like wood or asphalt. Metal roofs are designed to disperse electrical energy safely into the ground, minimizing the risk of fire or structural damage. Myth #2: Metal roofs are noisy Another common misconception is that metal roofs are noisy during rain or hailstorms. While it's true that metal can amplify sound, modern metal roofing systems are engineered with sound-deadening technologies to minimize noise transmission. Most metal roofs are installed over solid sheathing or insulation, which acts as a barrier to reduce sound transmission into the interior of the building. Additionally, the thickness and profile of the metal panels also play a role in noise reduction. Thicker panels and textured surfaces can help absorb sound and prevent reverberation, resulting in a quieter indoor environment during inclement weather. Myth #3: Metal roofs rust easily Some people believe that metal roofs are prone to rust and corrosion, especially in areas with high humidity or salt exposure. While it's true that certain metals, such as untreated steel, can rust over time, modern metal roofing materials are typically made from corrosion-resistant alloys like galvanized steel, aluminum, or zinc-coated steel. These alloys are specifically engineered to withstand exposure to moisture, UV radiation, and environmental pollutants without corroding or rusting. Additionally, many metal roofing products are coated with protective finishes, such as paint or ceramic granules, to provide an extra layer of defense against rust and corrosion. Myth #4: Metal roofs are expensive Another myth surrounding metal roofing is that it's prohibitively expensive compared to traditional roofing materials like asphalt shingles or clay tiles. While the upfront cost of metal roofing may be higher, it's important to consider the long-term value and cost savings that metal roofs offer. Metal roofs have an exceptionally long lifespan, often lasting 50 years or more with minimal maintenance. In contrast, asphalt shingles typically last 20-30 years before needing replacement. This means that while the initial investment in a metal roof may be higher, homeowners can save money in the long run by avoiding frequent roof replacements and repairs. Additionally, metal roofs are highly energy-efficient, reflecting solar radiation and reducing cooling costs during hot summer months. Many homeowners also qualify for energy efficiency rebates and incentives when they install a metal roof, further offsetting the upfront cost. Myth #5: Metal roofs are prone to dents and damage Some people worry that metal roofs are easily dented by hail, fallen branches, or other debris. While it's true that metal can dent under extreme force, most modern roofing systems are designed to withstand impact and resist damage from common sources. Many metal roofing products undergo rigorous testing to assess their resilience against hail, wind, and other environmental factors. Manufacturers often provide warranties that guarantee the roof's performance and durability under normal conditions. Additionally, metal roofs can be installed with underlayment and padding to provide additional cushioning and protection against dents. Myth #6: Metal roofs are not suitable for all climates Another misconception is that metal roofs are only suitable for certain climates and may perform poorly in extreme heat, cold, or precipitation. In reality, metal roofing is highly versatile and can be adapted to a wide range of climate conditions. For hot climates, metal roofs can be painted with reflective coatings or installed with airspace underneath to improve ventilation and reduce heat transfer into the building. In colder climates, metal roofs can be installed with insulation to prevent heat loss and minimize the risk of ice dams forming along the roof edges. Moreover, metal roofing is inherently resistant to snow and ice buildup, making it an ideal choice for regions prone to heavy winter weather. Metal roofs shed snow more effectively than other roofing materials, reducing the risk of structural damage and ice dam formation. Myth #7: Metal roofs are unattractive Some homeowners may be hesitant to choose metal roofing because they believe it lacks aesthetic appeal compared to traditional roofing materials. However, modern metal roofing products come in a variety of styles, colors, and finishes to suit any architectural design or personal preference. Metal roofs can mimic the look of traditional materials like slate, wood shakes, or clay tiles while offering the added benefits of durability and longevity. Additionally, it can be customized with architectural details, such as standing seam profiles or decorative trim, to enhance curb appeal and complement the overall aesthetic of the building. In conclusion, metal roofing is a durable, energy-efficient, and versatile option for residential and commercial buildings. By debunking these common myths and misconceptions, homeowners can make informed decisions about their roofing needs and enjoy the many benefits that metal roofs have to offer. Whether you're looking to replace an existing roof or embark on a new construction project, consider the advantages of metal roofing and choose a solution that meets your needs and budget. Hire the best metal roofing in Charlotte and Indian Land SC Advanced Roofing and Exteriors offers commercial roofing and residential roofing services to Charlotte, NC, Indian Land SC, and surrounding areas. 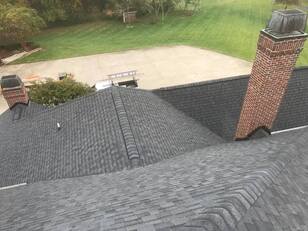 Shingle repair experts can comfortably maintain a functional roof in your home
Shingle repair experts in Charlotte and Indian Land SC can help you maintain a functional roof in your home. A missing shingle on your roof might seem like a minor issue, but it can lead to significant problems if left unaddressed. Shingles play a crucial role in protecting your home from various elements, including rain, snow, wind, and sunlight. When one is missing, it exposes the underlying layers of your roof to potential damage, such as leaks, moisture buildup, and even structural issues over time. Replacing a missing shingle promptly is essential to maintain the integrity of your roof and prevent further damage to your home. Fortunately, with the right tools and knowledge, you can tackle this task yourself. In this guide, we'll walk you through the step-by-step procedure for replacing a missing shingle to ensure your roof remains in top condition. Step 1: Gather Necessary Tools and Materials Before you begin replacing the missing shingle, make sure you have all the required tools and materials on hand. Here's what you'll need:
Once you have everything you need, you're ready to start the replacement process. Step 2: Assess the Damage and Remove the Old Shingle Begin by inspecting the area where the shingle is missing. Look for any signs of damage or wear on the surrounding shingles and underlying roofing materials. Carefully remove any debris or loose pieces around the missing shingle to ensure a clean work area. Next, use a pry bar or shingle removal tool to gently lift the shingles above the missing one. Take care not to damage the surrounding shingles during this process. Once you have access to the missing shingle, carefully lift it away from the roof and set it aside for disposal. Step 3: Prepare the Roof Surface With the old shingle removed, inspect the exposed area of the roof for any damage or debris. Use a brush or broom to clean away any dirt, dust, or loose particles. Ensure that the surface is smooth and free of any obstructions before proceeding to the next step. If the underlying roofing material is damaged or deteriorated, you may need to make repairs before installing the new shingle. Patch any holes or cracks with roofing cement and allow it to dry completely before continuing. Step 4: Install the Replacement Shingle Position the replacement shingle in the space where the old one was removed, ensuring that it aligns correctly with the surrounding shingles. Slide the new shingle into place, making sure it fits snugly against the neighboring shingles on all sides. Next, secure the replacement shingle in place using roofing nails. Drive a nail through each corner of the shingle, positioning them slightly above the adhesive strip to prevent water penetration. Be careful not to overdrive the nails, as this could damage the shingle or underlying roofing material. Step 5: Seal the Edges Once the replacement shingle is securely in place, apply a small amount of roofing cement or adhesive along the edges to create a watertight seal. This will help prevent moisture from seeping under the shingle and causing damage to the roof over time. Using a putty knife or caulking gun, carefully apply the roofing cement along the edges of the shingle, smoothing it out to ensure complete coverage. Be sure to seal both the top and bottom edges of the shingle to provide maximum protection against leaks. Step 6: Check for Proper Installation After installing the replacement shingle and sealing the edges, take a step back and inspect your work. Ensure that the shingle is securely fastened and that the adhesive is applied evenly along the edges. Look for any gaps or inconsistencies that may indicate a potential issue and make any necessary adjustments. Once you're satisfied with the installation, give the roofing cement ample time to cure before subjecting the roof to heavy rain or wind. This will ensure that the shingle is properly sealed and will provide long-lasting protection for your home. Step 7: Perform a Final Inspection After completing the replacement and sealing process, conduct a thorough inspection of the repaired area and the surrounding shingles. Look for any signs of damage, improper installation, or areas that may require additional attention. Address any issues promptly to ensure the integrity of your roof. Inspect the alignment of the replacement shingle with neighboring shingles to ensure a uniform appearance. Make sure there are no visible gaps or misalignments that could compromise the effectiveness of the repair. Step 8: Test for Water Tightness To verify the effectiveness of your repair, perform a water test on the repaired area of the roof. Using a garden hose, gently spray water over the replaced shingle and surrounding area. Observe the flow of water and check for any signs of leaks or water infiltration. Pay close attention to areas where the replacement shingle meets the existing roof surface and along the edges where the roofing cement was applied. If you notice any leaks or water seepage, reapply the roofing cement as needed to create a proper seal. Step 9: Monitor for Future Issues Even after completing the replacement process, it's essential to monitor your roof for any signs of damage or wear over time. Regularly inspect your roof for missing or damaged shingles, signs of water damage, or areas of concern. Check your roof at least twice a year, preferably in the spring and fall, to assess its condition and address any issues before they escalate. Keep an eye out for loose or lifted shingles, cracked or broken tiles, and areas where water may be pooling or accumulating. Step 10: Schedule Professional Inspections While DIY repairs can address minor issues, it's advisable to schedule regular inspections by a professional roofing contractor to ensure the long-term health and integrity of your roof. A trained roofer can identify potential problems early on and recommend appropriate repairs or maintenance to prolong the lifespan of your roof. Professional inspections are especially crucial after severe weather events, such as storms or high winds, which can cause damage to your roof that may not be immediately apparent. A thorough inspection by a qualified roofing professional can help identify and address any issues before they lead to more significant problems. Replacing a missing shingle may seem like a simple task, but it's a critical aspect of maintaining the integrity and longevity of your roof. By following the step-by-step procedure outlined in this guide and taking proper precautions, you can effectively address minor roofing issues and prevent more significant problems from arising. Remember to prioritize safety throughout the process and seek professional assistance if you encounter any challenges or concerns. With regular maintenance and prompt repairs, you can ensure that your roof continues to provide reliable protection for your home for years to come. Hire the best shingle repair experts in Charlotte and Indian Land SC Advanced Roofing and Exteriors offers commercial roofing and residential roofing services to Charlotte, NC, Indian Land SC, and surrounding areas.  Commercial roofer can help deal with moss
Commercial roofer in Charlotte and Indian Land SC can help deal with the issue of moss on commercial roofs. Moss growth on commercial roofs is a common issue, particularly in areas with high humidity and moisture. While moss may seem harmless at first glance, it can lead to significant damage to your roof if left unchecked. Not only does it compromise the integrity of the roof's surface, but it can also cause water pooling and drainage issues, leading to leaks and structural damage over time. Therefore, it's essential to take proactive measures to remove moss and prevent its recurrence. Here's a step-by-step guide on how to effectively remove moss from your commercial roof:
By following these steps, you can effectively remove moss from your commercial roof and mitigate the risk of damage to your property. Preventing Moss Growth on Your Commercial Roof While removing existing moss is essential, preventing its recurrence is equally important to maintain the integrity and longevity of your commercial roof. Here are some proactive measures you can take to prevent moss growth:
By implementing these preventive measures, you can effectively deter moss growth and maintain a clean, well-maintained commercial roof for years to come. Remember that proactive maintenance is key to preserving the integrity and longevity of your roofing system. Hire the best-rated commercial roofer in Charlotte and Indian Land SC Advanced Roofing and Exteriors offers commercial roofing and residential roofing services to Charlotte, NC, Indian Land SC, and surrounding areas.  Roofers can help you understand and mitigate roof-related dampRoofers in Charlotte and Indian Land SC can help you understand roof-related damp. A damaged roof can lead to various types of damp issues within a property. Among the most common is penetrating damp, which occurs when water leaks through the roof due to damage or deterioration. This type of damp can have significant effects on both the structural integrity of the building and the health and comfort of its occupants.
Penetrating Damp: Causes and EffectsPenetrating damp caused by a damaged roof occurs when water finds its way into the interior of a building through gaps, cracks, or holes in the roof structure. This can result from a variety of issues, including missing or damaged roof tiles, cracked flashing, poorly sealed joints, or degraded roofing materials. Once water enters the building, it can spread horizontally and vertically, affecting walls, ceilings, and even electrical systems. The effects of penetrating damp can be wide-ranging and damaging:
Dealing with Roof-Related Damp Addressing damp caused by a damaged roof requires a systematic approach to identify and remedy the underlying issues. Here are steps to effectively deal with roof-related damp:
By taking proactive steps to identify and address roof-related damp issues, property owners can protect their investment, safeguard the health and well-being of occupants, and maintain a safe and comfortable indoor environment. In the next part of this article, we'll delve into additional types of damp caused by roof damage and explore further strategies for mitigation and prevention. Additional Types of Damp and Mitigation Strategies While penetrating damp is a common consequence of a damaged roof, other types of damp can also arise from roof-related issues. Understanding these additional types of damp and implementing appropriate mitigation strategies is essential for effectively addressing damp problems and maintaining a healthy indoor environment. Condensation Damp: Causes and Effects Condensation damp occurs when warm, moisture-laden air comes into contact with cold surfaces, such as poorly insulated roofs or windows, resulting in the formation of water droplets. A damaged roof can exacerbate condensation damp by allowing moisture to enter the building, creating conditions conducive to condensation. The effects of condensation damp can include:
Mitigation Strategies for Condensation Damp Addressing condensation damp requires a combination of measures to reduce moisture levels and improve ventilation within the property. Here are some strategies for mitigating condensation damp:
By implementing these mitigation strategies, property owners can effectively reduce the risk of condensation damp and maintain a healthy indoor environment. In addition to penetrating and condensation damp, a damaged roof can also lead to rising damp, which occurs when groundwater rises through porous building materials such as bricks or mortar. Addressing rising damp requires specialized treatment methods, including damp-proof courses and waterproof membranes. In conclusion, damp caused by a damaged roof can have significant effects on both the structural integrity of a property and the health and well-being of its occupants. By understanding the different types of damp associated with roof damage and implementing appropriate mitigation and prevention strategies, property owners can protect their investment and ensure a safe and comfortable indoor environment for all occupants. Hire the best-rated roofers in Charlotte and Indian Land SC Advanced Roofing and Exteriors offers commercial roofing and residential roofing services to Charlotte, NC, Indian Land SC, and surrounding areas.  Residential roofing experts discuss the telltale signs of a roof that needs replacing
Residential roofing experts in Charlotte and Indian Land can help you understand the telltale signs to replace your roof. Your roof is one of the most critical components of your home, protecting you and your belongings from the elements. Over time, however, even the sturdiest roofs can deteriorate, leading to potential leaks, structural damage, and decreased energy efficiency. Recognizing when it's time to replace your roof can save you from costly repairs and prevent further damage to your home. Here are some telltale signs to watch out for: 1. Age of the Roof: One of the primary indicators that it's time for a roof replacement is its age. Most asphalt shingle roofs, the most common type in residential properties, have a lifespan of around 20 to 25 years. If your roof is approaching or has exceeded this age range, it's advisable to start considering a replacement, even if there are no apparent issues yet. 2. Shingle Condition: Inspecting the condition of your shingles is crucial in determining the health of your roof. Look for signs of wear and tear such as curling, cracking, or missing shingles. Over time, exposure to sunlight, rain, and temperature fluctuations can cause shingles to deteriorate, compromising their ability to protect your home effectively. If you notice widespread damage or significant bald spots on your shingles, it's likely time for a replacement. 3. Water Damage: Water stains on your ceiling or walls are clear indicators of a leaking roof. While some leaks may be minor and easily repaired, frequent or extensive leaks suggest underlying issues with your roof's integrity. Inspect your attic regularly for signs of water intrusion, such as damp insulation, mold growth, or rotting wood. Addressing leaks promptly can prevent further damage to your home's interior and structural components. 4. Sagging Roof Deck: A sagging roof deck is a severe problem that requires immediate attention. It typically indicates structural damage caused by long-term water exposure, insufficient support, or deteriorating roofing materials. If you notice a noticeable dip or sag in your roofline, consult a professional roofer to assess the extent of the damage and recommend appropriate repairs or replacements. 5. Granule Loss: Asphalt shingles are coated with granules that protect them from UV rays and enhance their durability. Over time, these granules may wear off, leaving your shingles vulnerable to damage. Check your gutters and downspouts for an accumulation of granules, as excessive granule loss is a sign of advanced shingle deterioration. If your shingles appear bare or have lost significant granules, it's time to consider replacing your roof. 6. Daylight Through the Roof: A surefire way to determine if your roof needs replacement is by inspecting it from inside your attic during daylight hours. If you notice sunlight shining through cracks, holes, or gaps in your roof, it indicates significant damage or deterioration. Even small openings can allow water infiltration and compromise your home's insulation and structural integrity. Addressing these issues promptly can prevent further damage and costly repairs down the line. 7. Increased Energy Bills: A deteriorating roof can also affect your home's energy efficiency. Gaps or leaks in your roof allow warm air to escape during the winter and cool air to seep out during the summer, forcing your HVAC system to work harder to maintain a comfortable indoor temperature. If you've noticed a sudden increase in your energy bills without a corresponding change in usage, your roof may be to blame. Investing in a new, energy-efficient roof can help reduce your utility costs and improve comfort levels in your home. 8. Damaged Flashing: Flashing is a thin strip of metal installed around roof penetrations such as chimneys, vents, and skylights to prevent water intrusion. Over time, flashing can become loose, corroded, or damaged, compromising its effectiveness. If you notice cracked, rusted, or missing flashing, it's essential to address the issue promptly to prevent water leaks and structural damage. 9. Mold or Mildew Growth: The presence of mold or mildew on your roof's surface or in your attic indicates excessive moisture and poor ventilation, both of which can lead to significant roofing problems. Mold and mildew growth not only detract from your home's appearance but also pose health risks to you and your family. If you notice any signs of mold or mildew, it's crucial to address the underlying cause, which may require roof replacement to ensure proper ventilation and moisture control. 10. Persistent Ice Dams: Ice dams form along the edges of roofs when snow melts and refreezes, preventing proper drainage and causing water to seep into your home. While ice dams can occur due to inadequate insulation or ventilation in your attic, they can also result from aging or damaged roofing materials. If you experience frequent ice dams during the winter months, it may be time to replace your roof with materials designed to mitigate ice dam formation and improve overall durability. In summary, being aware of these additional signs can help you determine whether it's time to replace your roof and take proactive steps to address any issues before they escalate. Regular maintenance and timely repairs are essential for preserving the integrity and longevity of your roof and ensuring the continued protection of your home and family. If you notice any of these signs, don't hesitate to consult with a qualified roofing professional to assess the condition of your roof and recommend the best course of action. Investing in a new roof can provide peace of mind and protect your home for years to come. Hire the best residential roofing experts in Charlotte and Indian Land Advanced Roofing and Exteriors offers commercial roofing and residential roofing services to Charlotte, NC, Indian Land SC, and surrounding areas. |
AboutLearn about your options when it comes to roof repair and roof installation in Charlotte. Archives
July 2024
|
 RSS Feed
